Salt reprisal

7:32 am

I was so exhausted while writing my last post I’m not sure I explained the purpose and process of salting raw skins.

Salt is a preservative, so firstly it prevents decay of the skin tissue. It does so by drawing out water and inhibiting bacterial growth. This is essential to a good tanning result.

Salt also helps to “stick” the hair in the skin. This is partly because of the dehydrating effect. But don’t be fooled – salt cured hides aren’t tanned, and if they get wet they can lose hair and decay.

I added a single layer of salt to my deer skins the other day. Yesterday when I checked on them I found what I expected.

Liquid is pooling and collecting on the hides. This just means the salt is doing its job.

I picked up each skin to let the liquid run off and shook off some of the wet salt. I’ll sweep it up after it dries and reuse it. Then I added more salt. Quite simple!

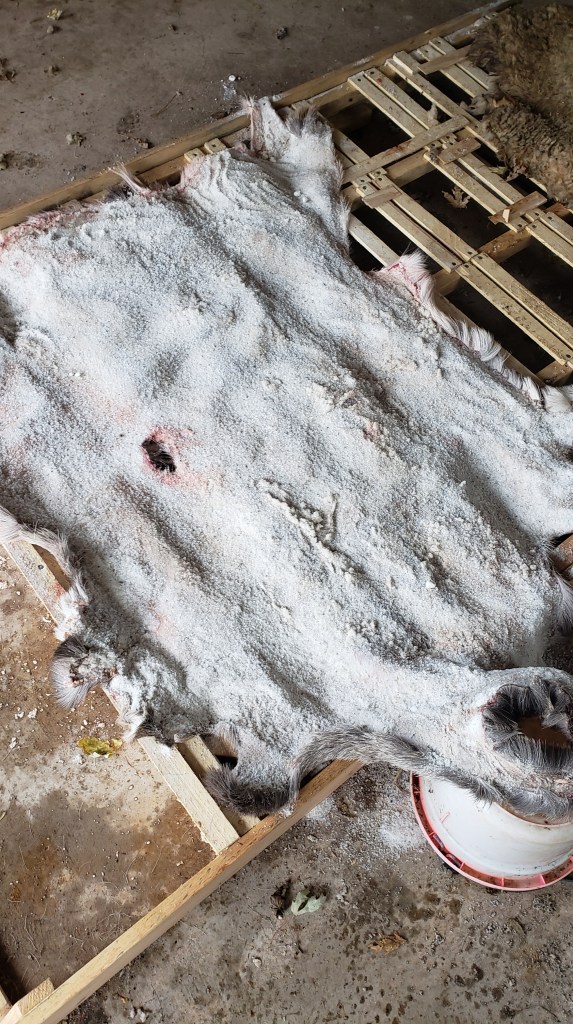
I can’t stress enough that it’s important to get those crevices and edges! The edges will try to trick you by rolling in. One of these hides came to me with the tail still on, bone and all, and I managed to save it – that’s an area I’ll have to pay particular attention to.

And now we wait. The next steps for these deer hides don’t start until they’re salt-cured. Meanwhile, I’ll see what I can do with a sheepskin.

Soap and Oil Tanning Solution Instructions

This will be another “resource” post. I’ve mentioned my tanning dressing in several posts now, and more or less explained it once, but I want to give clear instructions for the recipe here – for reference!

Ingredients:

  1. Handmade natural, plain soap. No essential oils or other additives. I make my own from rendered lard or tallow, sometimes from pure olive oil.
  2. Purified water. If you have hard well water like me, don’t use it.
  3. Neatsfoot oil. Alternatively you could experiment with using other oils, like vegetable or olive, but I like to keep all my tanning fats animal-based in the spirit of using byproducts of meat production.

You’ll also need a large pot for boiling water, a large wooden or nonstick spoon, and a sturdy bucket.

Steps

  1. Put about a gallon of water on to boil.
  2. Meanwhile, grate a bar of soap as finely as you can. My bars are 4-5 ounces.
  3. When the water reaches a boil, add the soap and remove the pot from the heat right away
  4. Stir gently; try not to create much lather
  5. After all the soap has dissolved and the solution is cooled but still hot, pour it into the bucket
  6. Add about a cup of neatsfoot oil and stir
  7. You’ll need to stir until you have a homogenous solution
  8. Let cool, and you’re ready to tan with it

Water and oil don’t usually mix, but the soap acts as an emollient, allowing them to form a solution.

This tanning mixture is similar to a brain tanning mix – it has water, fats, proteins, and emollient.

Alum & Tawing

I’ve mentioned “tawing” and “alum” here a few times, and it occurred to me that it might be helpful if I explain what the hell I’m talking about.

Alum is a naturally occurring mineral, a salt of aluminum. Specifically, it’s aluminum sulfate. Alum is not chrome or chromium! A Google search will tell you that alum is used for pickling and food preservation, as well as making leather. Historically it was also used to leaven bread.

When alum is used for leather-making, the process is called tawing. This is mineral tanning, which is one of the most ancient forms of tanning. Purists will probably argue that it’s “not really tanning” – I don’t totally disagree, but would point out that’s why the process has a different name.

I was taught about using alum on fur-on animal skins by the leather-maker at Colonial Williamsburg, who was a friend of my husband, in 2010.

I’ve heard it said that tawing produces stiff, hard leather. This is only true if you don’t work and stretch the hide as it dries, which is true of tanning with soap, bark, oil, egg, or brain as well!

When I do large hides (sheep, goat, or deer vs. rabbit or raccoon) I first taw the skin in alum and salt. Then after rinsing with clean water, I apply my soap and oil solution to the wet skin to tan it. I realize this sounds like overkill or a double process, but once I started tawing before tanning I never had the dreaded hair, fur, or wool slippage again!

For small pelts I’ll often just taw them by soaking in a strong pickling solution of alum and salt, and then hand-stretching as they dry. It’s so easy to do lots of small skins this way, and the leather can be further softened and darkened with neatsfoot oil.

I’ll do more of these “resource” posts as I go.